
A fully new world of photographic possibilities exists while shooting aquatic. Indeed seasoned shutterbugs first have difficulty there. Aquatic photography gets further grueling in every way. I will partake some of my favorite advice in this composition to help you learn the fundamentals of aquatic photography without having to go through the literacy wind.
Fete How Light Behaves in Water
When light travels through the water as opposed to air, it acts in an unnaturally different way. Significant ramifications flow from this for aquatic shutterbugs.
Everything is blue aquatic, which is the most conspicuous change. An object will appear bluer and bluer the further it’s down. analogous to how blue thresholds take the place of all other colors as you go deeper underwater.
Red is particularly vulnerable to this shift. Indeed if you hold a commodity exactly in front of your eye, red objects at moderate depths will appear veritably dark and desaturated. However, they will likewise appear darker at first regard, If they’re far down from you.
As you change directions, acclimate the camera.
Firing down fully alters your exposure from shooting horizontally or overhead, which is one difficulty with aquatic photography exposure.
Firing overhead is exorbitantly bright while shooting upward may be oppressively underexposed in the same settings. Thus, I advise using orifice precedence mode when shooting in natural light so that the camera can automatically acclimate for these dissonances.
Also, you can use the bus ISO menu options to select a minimal respectable shutter speed, similar as1/200 seconds, and let the camera acclimate the ISO as
necessary. You still have complete control over your minimum shutter speed and your orifice when using orifice precedence mode with Auto ISO.
Know the Sun’s Direction
It’s not always incontinently apparent where the light is coming from aquatic. Still, because it impacts how light and shadow appear on your subject aquatic, the sun’s angle is just as significant as it’s on land.
Beyond that, firing towards the sun will result in significant backscatter from water patches, which will reduce the discrepancy. Aiming at the sun’s modest inclination can beget the same issue, indeed when you are shooting horizontally and it appears to be exactly above. This is why I aim to take natural light aquatic prints with the sun at my reverse.
Nonetheless, due to the murky atmosphere, it produces, shooting toward the sun can sometimes affect desirable outlines and backscatter. There are exceptions, as with utmost effects in photography, but indeed in similar cases, you can not take advantage of them unless you know which way the sun is shining.
Make Use of Submarine Flash
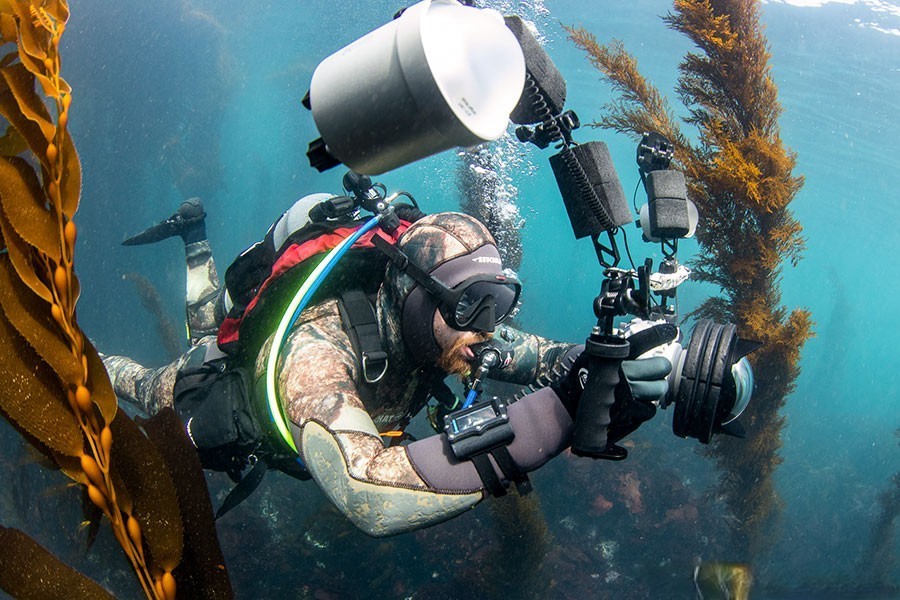
The use of a flash aquatic has pros and cons. It has the power to recover light — as well as the color red — from the depths. still, it can also reflect patches, performing in backscatter and brilliant patches. The backscatter gets worse as there are more patches.
Adding the distance between the light source and the camera is the most effective approach to help backscatter( note – the camera, not inescapably the subject).
This makes the patches less conspicuous by precluding them from reflecting light back directly at the camera. Unfortunately, the only aquatic strobe that can do this is one that has separate arms that come off the camera. Unless everything in the image is relatively close to your lens, it’s recommended to avoid utilizing the on-camera flash.
By putting your aquatic casing to a charger table, you may connect a flexible arm that holds the strobe to the camera. A fibre optic string that’s fastened to the casing in front of the flash also triggers the strobe.
You can snap the sun while still exposing your subject since strobes may light up murk. In order to avoid overusing the subject and insure optimum lighting, this fashion necessitates precisely conforming the strobe’s strength, position, and settings. It’s advised not to let the strobe flash brightly to help backscatter.
A fibre optics string, arm, charger table, and strobe aren’t affordable purchases. Still, photography aquatic makes a significant effect, especially when at depth or if colour is significant. I should add that endured aquatic shutterbugs generally use two strobes when firing! Although the price nearly doubles, it provides brighter lighting and eliminates murk.
Get Up near and particular
Being aquatic is great because you can virtually fly! Take advantage of that when shooting aquatic. Boring aquatic prints can be stylishly captured by shooting from the face.
When shooting over, there’s a far lower discrepancy, and it’s doubtful to be the most charming standpoint for your subject. Dive down so you can snap horizontally, which can catch further discrepancy and background indeed in only many bases of water.
You should constantly try to get as close to your subject as you can. This brings us full round to the first consequence of photography aquatic distance degrades discrepancy and color. Because of this, the maturity of aquatic shutterbugs use ultra-wide lenses, including fisheyes
Check the water quality before entering.
Successful Aquatic photography requires ideal water conditions, especially in the ocean. Aquatic visibility is a dimension of how far you can see. In some places, like the tropics, visibility can be relatively good for the maturity of the time, with just a few brief exceptions, or it can be veritably low for the maturity of the time, like on the west seacoast of the United States. It all depends on how numerous patches, generally ground or plankton, there are in the water.
Ask the dive driver about recent conditions if you are going with them, but take in apprehensive that they can be misrepresenting visibility to get your business. Ask a lot of pointed questions before spending a lot of plutocrats on a trip.
Plankton blooms, which can make the water nearly entirely murky and green, do seasonally, especially in temperate( cold water) zones. The topmost and worst seasons for plankton vary in every region. Find out when the stylish time of time is to go diving before making trip plans.
How important ground is stirred up by swells is one point of the ocean conditions that lower predictable. However, make sure to check the sud’s vaticination to see if there will be any particularly strong swells in the region If you plan to take aquatic prints while swimming in the ocean alone.
Vacations for suds can be fairly accurate several days in advance because swells constantly travel a great distance before reaching the reinforcement. When the swells are the least, you want to enter the water.
Edit Your Submarine filmland
The process of editing is essential to aquatic photography. Recall my first piece of advice about how reds and discrepancies get lost in the water. In order to produce high-quality aquatic prints, proper attention must be taken. Your editing program’s angles adaptation will come to your stylish chum.
It’s absolutely worth investing in editing software that allows you to handle RAW lines and that does an excellent job at color correction if you want to perform a lot of aquatic photography. An image from a GoPro that has been duly edited will look vastly better than one from indeed the stylish aquatic outfit.
They are the way I generally take
Remove the green first by altering the angles or shade settings till the image becomes a little too magenta.
Next, exclude the blue by conforming the white balance bar or angles( and this should correct for the redundant magenta, too).
Eventually, if necessary, consolidate the reds using situations or angles. It’s vital to the flashback that changing the red situation will have no effect if the water fully excluded the red from the scene.
As usual, make all other post-processing variations.
Differ will be slightly increased as a side consequence of changing white balance, angles, and situations, although generally, this is also desirable. Pro tip Changing the white and black situations and angles can achieve more dramatic discrepancy adaptations than a simple discrepancy slider.
Conclusion
With these pointers, I hope your preface to aquatic photography will go more easily than it did for me. It’s relatively satisfying to learn the aquatic photography nuances. Leave a comment below if you’ve encountered any other difficulties with aquatic photography that I may have missed, and I will try to give you some advice to help your forthcoming design go more fluently.
![]()
